Do you like to turn your normal photograph into an amazing portrait with some creative effects? You can do it simply by Photoshop editor. Any photo can be turned to great portrait. Here we will learn how we can do this.
You can find lots of photo editing soft wares, which are widely available in shops as well as web. However, they must be quite expensive. I found a free software, GIMP , which is very useful, and you can retouch your photos easily via this software.
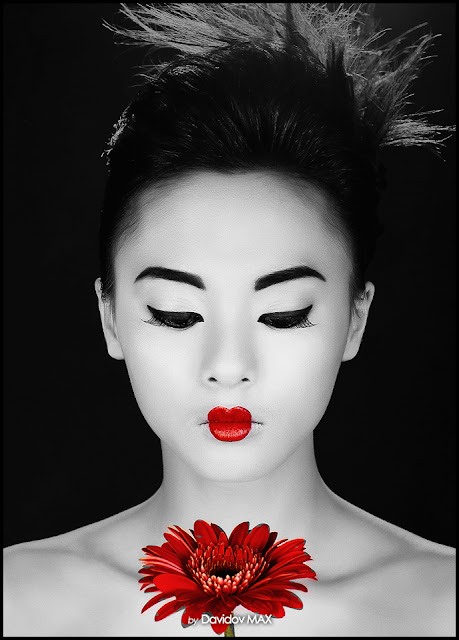
You might have seen photos of Black and White images with a dashing color effect. You might have wondered how they created this effect. But it is not hard. Just follow these simple steps. I used GIMP to create this effect.
Choose any photo, which you like to turn into amazing portrait.
Right-click on the photo, select OPEN WITH and select GIMP or you can simply open GIMP, go to FILE, OPEN, and select the photo from its file location.
LAYERS window should open in default, if not you can click on to WINDOWS >> Dokcable Dialogs >> Layers or simply hit ctrl+L.
Click on the small icon, which is located at the bottom of the LAYERS window, and create a new layer. LAYER FILL TYPE should be TRANSPARENCY. Once you click OK, the new layer will appear in layers window.
Create a duplicated image
Click on the IMAGES tab and select DUPLICATE or hit ctrl+D. You will get another screen with the duplicated image.
Create a black and white image.
Go to the duplicated image, click the LAYERS window, and select the second layer, which is named as BACKGROUND. After selecting, click on COLORS tab>>DESATURATE.
You will get a new window named DESATURATE. You can select the shade type whichever you want. Make sure you selected the background layer before go to colors tab, else the new effect won't be applied.
After applying the appropriate shade, click on the EDIT tab, and the select COPY. Go to the Original, color image (now you can close the duplicated Black and White image, you will not need it anymore in this process)
Click on the NEW LAYER on the LAYERS window. After that, go to EDIT tab and click on the PASTE option. You will get another layer named FLOATING SELECTION (Pasted selection). Select that layer and go to LAYERS tab on top. Click on the ANCHOR LAYER or you can simply hit ctlr+H.
Now the original image will appear in black and white. Now click on the NEW LAYER in layers window, go to TOOLBOX window, and select the ERASER option. Visualize the part where you want to add color. You can use ERASER option and try erasing the particular part of the image. While erasing, you can see the colorized part.
You can adjust the scale option to adjust the Eraser size. If you make any mistake in this process, you can always click on EDIT tab and UNDO. While using eraser option, you can make use of Anti erase option to adjust the coloring. You can also use magnifying tool which is located in the VIEW tab to zoom the image while editing.
After coloring the particular part, go to LAYERS tab on top. Select MERGE DOWN to merge this layer with background layer and finish the process.
You can click on FILE>>SAVE AS>>Give any name to the image (It will ask you to export the flatten image)>>Increase the quality to 100 and click SAVE.
You can create amazing photos by this method. It is better to select the images with BRIGHT objects to enhance the quality and create eye-catching images.
You can find few images below which are created by this process.