Wednesday, May 25, 2011

How to steal colors to your images?

All right, here I will tell you a famous tip about stealing. Well, it is not about stealing an image itself, but stealing only the basic color. We can make our targeted image (if it is a dull one) into an interesting and a colorful image. 


You can do it using Photoshop or Gimp. First, I’ll give you a short instruction about GIMP methodology.

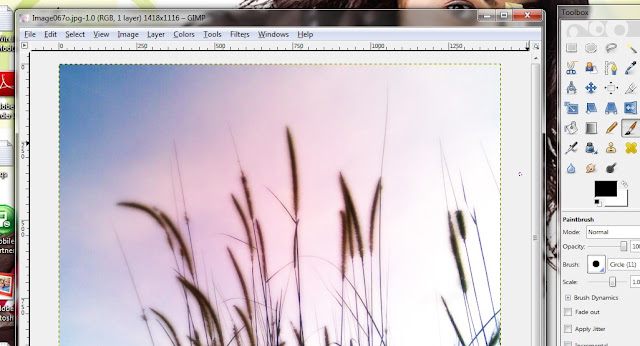
Choose any image, which is dull in color, and open it through GIMP. Choose another image which is colorful and the same time make sure this image color should match your targeted image.

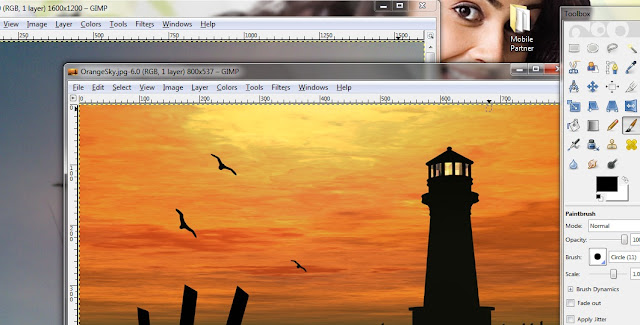
Select a dull color image


Select a bright color image


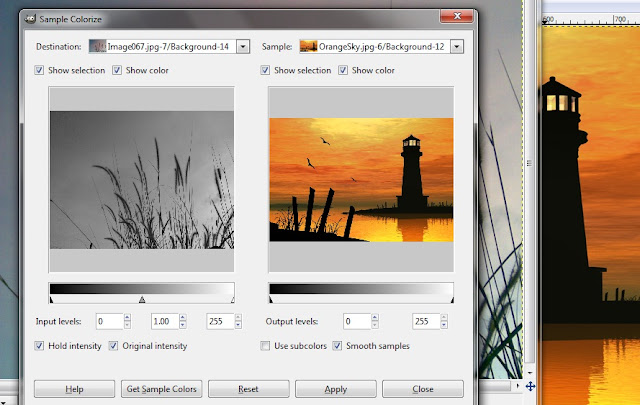
Once you open both, go to your targeted image. Select COLORS>> MAP >> SAMPLE COLORIZE. You will get a small window named Sample Colorize. 


Select Sample Colorize


Click on Get Sample Colors
On top, you can see an option as DESTINATION with a drop down menu. Make sure your targeted image appears there. In the right side, your bright color image should appear as SAMPLE.

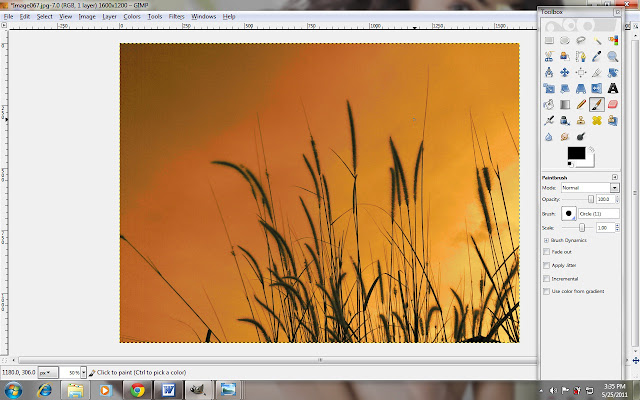
Now, click on GET SAMPLE COLORS button on bottom. You may be able to see the color change in your targeted image. If you are satisfied with the new color, you can click on APPLY>> CLOSE. Else, try with some other bright color samples.

Your image with new color.
 You can apply the same with Photoshop. Play with colors. :)


Monday, May 23, 2011

Black and White Photography

I tried capturing some black  and white photographs, and the same time I turned some color photos into black and white. Amazingly they turned into great portraits. 


Human Behavior

This is one of my favorite photograph. It was taken by me four years back. My nephew tried to pose for photo by pretending just like his grandpa. 


Statue of a Guardian Angel


I clicked this photo in Kataragama when we went for a pilgrimage this year. I edited this photo by blurring and overlaying to give a dreamy like effect. This photo looks better, when the tiny details of the photograph is blurred and hidden. 


Broom and Mop

It is a simple photograph of a broom and a mop. I took it in our backyard. We do not need to travel and spend hell lot of money to capture great photos. But simply you can capture some household props in great way by adjusting your camera angle.

Wooden Fence

 The misty background framed by a wooden fence and trees. 

Grass Plants
I did some editing here to add some glow into this photo. Guess what, when I took this photo, there were no bright lights. It was around 7pm in the evening. Though the background was dark, the photo does not reflect the actual lighting.

Saturday, April 30, 2011

Black and White Images with Glimpse of Dashing Color Effect- A GIMP Tutorial : Detailed Guide


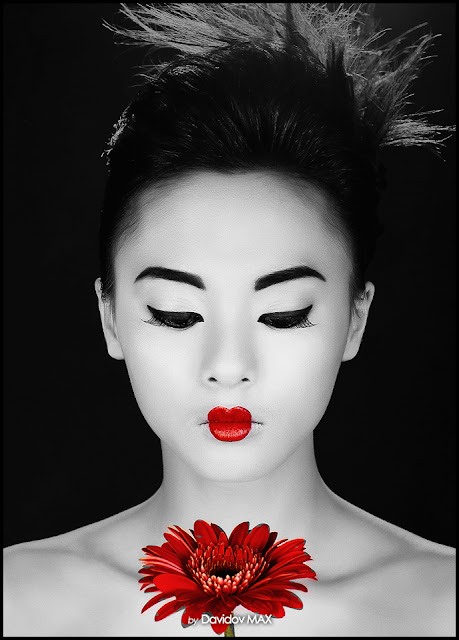
Do you like to turn your normal photograph into an amazing portrait with some creative effects? You can do it simply by Photoshop editor. Any photo can be turned to great portrait. Here we will learn how we can do this.
You can find lots of photo editing soft wares, which are widely available in shops as well as web. However, they must be quite expensive. I found a free software, GIMP , which is very useful, and you can retouch your photos easily via this software. 

You might have seen photos of Black and White images with a dashing color effect. You might have wondered how they created this effect. But it is not hard. Just follow these simple steps. I used GIMP to create this effect.

Choose any photo, which you like to turn into amazing portrait.

Right-click on the photo, select OPEN WITH and select GIMP or you can simply open GIMP, go to FILE, OPEN, and select the photo from its file location.


LAYERS window should open in default, if not you can click on to WINDOWS >> Dokcable Dialogs >> Layers or simply hit ctrl+L.


Click on the small icon, which is located at the bottom of the LAYERS window, and create a new layer. LAYER FILL TYPE should be TRANSPARENCY. Once you click OK, the new layer will appear in layers window.


Create a duplicated image
Click on the IMAGES tab and select DUPLICATE or hit ctrl+D. You will get another screen with the duplicated image.


Create a black and white image.


Go to the duplicated image, click the LAYERS window, and select the second layer, which is named as BACKGROUND. After selecting, click on COLORS tab>>DESATURATE


You will get a new window named DESATURATE. You can select the shade type whichever you want. Make sure you selected the background layer before go to colors tab, else the new effect won't be applied. 


After applying the appropriate shade, click on the EDIT tab, and the select COPY. Go to the Original, color image (now you can close the duplicated Black and White image, you will not need it anymore in this process)


Click on the NEW LAYER on the LAYERS window. After that, go to EDIT tab and click on the PASTE option. You will get another layer named FLOATING SELECTION (Pasted selection). Select that layer and go to LAYERS tab on top. Click on the ANCHOR LAYER or you can simply hit ctlr+H. 


Now the original image will appear in black and white. Now click on the NEW LAYER in layers window, go to TOOLBOX window, and select the ERASER option. Visualize the part where you want to add color. You can use ERASER option and try erasing the particular part of the image. While erasing, you can see the colorized part.


You can adjust the scale option to adjust the Eraser size. If you make any mistake in this process, you can always click on EDIT tab and UNDO. While using eraser option, you can make use of Anti erase option to adjust the coloring. You can also use magnifying tool which is located in the VIEW tab to zoom the image while editing. 


After coloring the particular part, go to LAYERS tab on top. Select MERGE DOWN to merge this layer with background layer and finish the process.

You can click on FILE>>SAVE AS>>Give any name to the image (It will ask you to export the flatten image)>>Increase the quality to 100 and click SAVE.


You can create amazing photos by this method. It is better to select the images with BRIGHT objects to enhance the quality and create eye-catching images. 

You can find few images below which are created by this process.


Monday, April 25, 2011

Usual things in unusual way - Old Branches and left over of Trees

There are so many usual things lays just in front of us. But we never pentay any attention on them or see their beauty. I have clicked some old tree branches with my 2 Mega Pixel Cam(Mobile).

How lovely they are even without leaves? Place your comments if you like them.

Covered by Purple Sky
Left-over and Flowers
River framed by Wooden Fence
Roots of a fallen Tree
Branch
Covered by Purple Sky
River framed by Branches
Snake.......................???
River framed by Branches
Roots

Sunday, April 24, 2011

What I Could Click With 2 Mega Pixel Mobile Cam - Animal Planet

Hi Folks,

I just tried to experiment with my 2 Mega Pixel Mobile Cam (Nokia 6300, which is very popular for lower camera picture quality). I just thought of publishing them here.

I'm just a beginner. I really expect you all to place your valuable comments on these photos which will make me to improve my skills.

I found these pets in my hometown. They looked so cute. Here they are.......

Black Ducky
Colorful Sexy Chicks
Here the Hero............
Relaxing Monkey.....
Ducky Again.
Colored One - Quality turned Poor.
Hey, We are not black sheep....
Colored Hen - The Color quality Didn't turn up well.
Feast.........
Sheep..... Mehahhhhhhhhhhhhhh........